Redrock Circular Polarizer, .6 ND and Soft edge horizontal grad (perfect for landscape). All filters come with their own pouches, however I am disappointed that I have to spend more money to get microfiber cloth for the filters.
Yes, finally an affordable filter set for the starving indie crowd. $495 gets you three piece of 4 x 5.65 glass filter directly from RedRock Micro. You get a Circular polarizer (not the cheap linear ones), a horizontal Graduated .6 Soft edge and a .6 ND. Individually other manufactures are charging anywhere from $250 - $850 per filter in the 4 x 5.65 size.
Tiffen 4 x 4 filter next to Redrock 4 x 5.65 filter.
In theory, 4x4 size filters are only really suitable for standard 16mm and non-widescreen electronic cameras. 4x5.65 filters are very suitable for Super 16 or 16x9 HD or other 2/3" cameras. 4x5.65 is also the smallest practical size for 35mm cinematography. The 4x5.65 size is also referred to as "Panavision" size and was originally developed by Panavision as the most compact size that would cover their widescreen anamorphic lenses. 5x6 filters are not very common, and will only fit the ARRI MB-14 and MB-15 Matte Boxes. 6.6x6.6 Is the largest size commonly produced. Choose 6.6x6.6 for 35mm format shooting with graduated filters (grads) and for covering extremely wide angle lenses, or for those lens with very large front element.
The edge finishing on the Redrock filter (upper left), a newer Tiffen filter with its signature green finishing (upper right) and an old Tiffen filter with its smooth side finishing (lower right). Quality wised, the finishing on the Tiffen filters are way smoother and more polished than the Redrock. Only time will tell how durable the glass and the finishing will last and how well it resist cracks and chips being clamped unto the filter trays.
According to Redrock, their filters were made from shott glass material. I wonder who made these filters for them ... hmmm. Let see... another big filter compay that uses the same glass is Formatt. And hmmmm... if you click on the first picture you can see Polarizer being spelled as 'Polariser' which is U.K/British English ... and Formatt is a U.K company........ hmmmm. Formatt used to be known of using 3mm glass instead of the standard 4mm glass thickness for their cheaper end filters. Luckily, all the Redrock filters are made of 4mm glass. phew ...
Overall the Redrock filter feels hefty indicating they were made from solid good quality glass. my 4x4 Tiffen weights 3.8 oz, my retro 4 x 5.65 weights 4.9 oz and the Redrock weights 4.8 oz. Unfortunately, I do not have a mattebox to actually test the filters. I will do some tests once my Redrock mattebox ships (one advice, don't hold you breath for this one though).
I love my old retro Tiffen genuine leather pouches the best. It has this soft almost microfiber like material inside. Both the Redrock and the newer 4x4 Tiffen filter pouches are you standard run of the mill nylon material.
The Redrock filters came wrapped in this very thin baking paper material. If you know of any cheap place to get a big microfiber cloth for filters, please shoot me an email or a comment please.
If you want the highest quality filter, then you should shop for Schneider but their 4 x 5.65 circular polarizer alone is $415. If you use 35mm still lenses or the stock 1/3" camera lens, you might be able to get away with Schneider's lower end 'century 4 x 4 (5 piece) filterset' for only $ 499.00
Thursday, July 31, 2008
Sunday, July 27, 2008
Zacuto Universal Baseplate v3
Zacuto, a small company out of IL, rised to fame in middle - late 2007 with their Universal Baseplate + Z-Riser combo, thanks to the introduction of 'flip' 35mm adapters, like the Letus Extreme. Before the flippers, everybody in indie land was living happily with their redrock, cavision, (insert your brand here) baseplate system. Baseplate and rods are cheap and everybody was happy as a clam.
With the Letus Extreme, suddently everybody have ergonomic issue with their camera setup. Cameras were suddently levatating 3-4 inches up in the air, 5-6 inches away from the center of the tripod. Many people do not realized COG (Center of Gravity) concept and how it affects the operations of your tripod. E.g. you can hold more weight if you hug the item closer to your body (your COG) and if you extend you arm away from your body (COG), you can hardly support or hold the same weight load.
Yet, you see people putting their camera all the way off the COG of their Bogen 503 tripod, with long noga arm extending left and right supporting their Marshall LCD and their monitor battery. Then they wonder why their footage is not smooth or why their monitor keeps falling off their noga arm. If you want to learn more about COG and your tripod, check out Vinten's website.
Enter the $560 Zacuto universal baseplate (v3 now). I know, the price, that was the same initial reaction that came out of me. What could the Zacuto do that my $160 Cavision couldnt do, I scoff. Well ... lets see.
Horizontal adjustments of ~ 2 inches. The long silver plate clamps down and hold the red anodized main plate in place. You tighten down the silver plate with two 4mm allen bolts on the bottom of the baseplate.
Vertical adjustments of about 3/4" of an inch. Also note the threaded female rods, allowing extention with male rods. Every single bolt in the whole system is 4mm in size.
Back/Fort adjustments on your tripod plate of ~ 4 half inch so you can balance your front or rear heavy cam.
The underside of the Zacuto universal baseplate v3. Notice the 4 bolts on the outside of the system. Those are the bolts that you use to clamp down the silver plate in order to secure the red anodized main plate.
Now here is the best feature of the Zacuto Universal Baseplate system. Every single bolt and element in this design is MODULAR and removable/replaceable. No wonder Zacuto is providing free lifetime warranty to their products. Everything is very very very VERY well designed and executed, there are no wobble, no misfit parts and everything was made to withstand the rigours of life on the set. For god sake, this thing weights 3 1/2 pounds ++ vs 1 1/2 lb on the other rod support system, you can slam the Zacuto universal baseplate hard to the ground and you are probably just going to scratch it. The only downsize of the product is that the allen bolts are not stainless steel, and one of the bolts on my baseplate developed some corrossion and I had to remove the rust.
My old Nightmare. The $160 Cavision rod system is just a toy compared to the Zacuto. The design is extremely flimsy and do not inspire confident at all. I could never get my cam to be rock steady on the tripod with the Cavision. Some bolts ont he Cavision would not aligned with the slots, as a result every single bolt needed to be checked and tighten and forget about that peace of mind that your $15k + camera system might just come falling off.
Like I used to say, your camera is outdated annually in April (NAB) but there are certain things that are part of your foundation that will follow you and last forever. Your rod support system and tripod are certaintly on that list. Yes, everything Zacuto is expen$ive, but you are actually paying for something that works incredibly well that you can pass on to your grand children.
Labels:
35mm,
baseplate,
rod support,
zacuto,
Zacuto universal baseplate
Saturday, July 26, 2008
Installing Ferrite Cores to power cable.
Page 86 on Panasonic Hpx500 user manual stated that we need to fit a ferrite core within about 5cm (2 inches) from the DC 4 pin XLR power cable. Problem is, the power cables for my IDX Charger is flat and would not hold the ferrite code tight. As a result, the 2 ferrite cores will move freely along the length of the cables.
A simple solution that I found is just to put a zip tie cable on each end to prevent the ferrite core from slipping and moving freely. In case you are wondering, those Ferrite cores are used to limit RF(Radio Frequency) interference. You definitely want the cleanest power possible to your camera as spikes and interference could have adverse effect to the cam. In the Panasonic HVX200's manual, Panasonic even recommended ferrite core to be installed to the firewire cable.
Labels:
ferrite,
ferrite core,
hpx500,
panasonic,
panasonic hpx500
Camie's new shoe.
After spending $14,000 on a camera body, posts like this will certainty scare the crap out of anybody. However, in order to fit a FF and mattebox, we new a new baseplate and 15mm rod support system. Based on the horror "tales from the Internet", this procedure is almost as horrific as replacing the battery plate from the stock Anton Bauer to IDX. The last thing that I need, is to pack up a new HPX500, put it on the box, insured it and ship it back to New Jersey and being without Camie (Yes, I name my camera :/ ) for 2 weeks.
There are 4 screws on each corner to be removed. After the first try with a normal 'longer' length screw driver, it is obvious that there wasn't enough torque and pressure to move the 'loctite-d" screws. Do not continue or force if this happens, as you will just strip the screws and then off to Jersey your camera with the men in brown. And absolutely no electric screw driver allowed either !
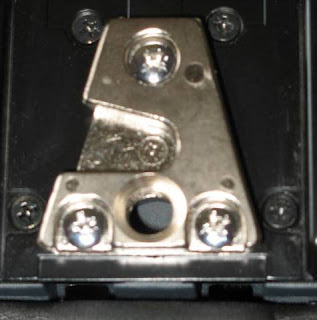
The Screw of controversy.
So, I decided to use a screw driver that has a very short shaft, so that I can put more pressure and torque with every turn. Guess what? all 4 screws came out marvelously with just some firm pressure. I would also advice you to remove the fragile viewfinder when you have your camera upside down to access the plate.
Yes, the screws were dipped in blue "temporary" locktite as reported on the internet forum but again with some dilligent, all 4 screws will/should come out perfectly. I do not have my new baseplate yet, but I guess depending on the height/thickness of the baseplate, there might be a need for new longer screws.
In conclusion, you can ignore the horror "tales from the Internet", and safetly remove the 4 screws on your camera yourself. There is no magic dealer methods, you dont need Thor to tap on the screws, no special techniques, no special philips screw drivers ....etc. Just some gentle hands (the screw's threads are fine) and common sense will surfice. However, if you are mechanically challenged, just get a 6 pack and get a more mechanically inclined friend to do it for you. With just little effort and patience, it is definitely a DIY job. It is not that big of a deal as portrayed by the others.
Labels:
hpx 500 baseplate,
hpx500,
panasonic,
panasonic hpx500
Camie's New Power block
The Panasonic Hpx500 camera comes standard with Anton Bauer Gold Battery mount. However the battery of choice for the studio is the IDX Sony V mount. Currently we have 2x Endura 10s battery with the IDX VL 2 Plus Charger.
We ordered the IDX V-Plate (Part number: P-V2) for the endura battery system (~$106.00). Depending on your camera, they also have the IDX V-Plate S (Part number: P-VS2 with Syncron). Syncron is an automatic light control system that allows an on-board camera light to be switched on and off automatically when the camera record button is pressed. So check with your camera user manual before placing your order for the correct IDX plate. Yes, both plates have a D tap power out (max: 50w)
Changing the battery plate from the stock Anton Bauer to IDX is not as easy as I thought. The mechanics of it is easy, there are only 3 small connectors that needed to be swapped. However, what makes the swap a challenge is the space inside the camera. You REALLY have to be super delicate in order to work with the super fine tiny wires, tiny connectors in a very very very cramped space. If you have larger hands or not comfortable, I would recommend taking it to the store to have this swap change. There is no sense in breaking and damaging the 3 delicate wires inside your camera that carries the main power to your cam.
Extremely tiny workspace with delicate cables and connectors. Requires tremendous amount of patience and gentleness.
. The inside of an Anton Bauer Plate. Notice the 2 connectors for the Anton Bauer plate. The IDX has 3 connectors.
There are two types of connectors or cable in a battery plate system, the big main one that carries the juice and another cable that carries information to your camera. IDX calls it their Digi-View system, and they both type 1 (shows batt capacity in 10% step) and type 2( 1% steps).
If you dont feel like operating on your camera or paying someone else to fit the IDX V-plate, you can also purchase a AB to IDX adapter plate, but due to the AB design, you will lose the Digi-View, Syncron and (I think*) the D-Tap power as well.
Labels:
anton bauer,
camera battery,
hpx500,
idx,
panasonic hpx500,
sony v
Subscribe to:
Posts (Atom)