
My new 'modded' Redrock Micro Mattebox 15mm setup that allows you to slide the mattebox on the entire length of the rods.
The Problem.
 The new Redrock Micro Mattebox is a god sent solution to us poor indie filmmakers. However, you might be disappointed in how the 15mm rail version of the mattebox was designed. The mattebox was designed a bit too low, as the result, you are forced to mount the mattebox at the exact end of your rails. (NOTE: The 19mm version of the mattebox does not have this problem).
For 35mm adapter user (especially if you mix zooms and primes), this also means that you got to have exact length rails for each of your different length lenses. As you can imagine, it is a pain to do that in the field and also could be expensive and troublesome (cutting different rails to match different lenses). Also, if you want to use the mattebox with your camera's original lens, you might have problem to get the mattebox to be close enough to the camera lens without using an extremely short rails.
The Solution.
Until Redrock decides to fix this problem, here is a simple solid solution that you can execute now.
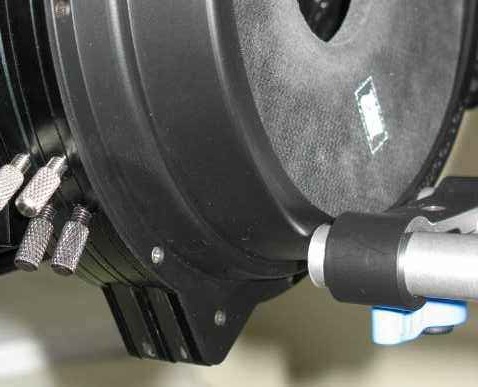
 Step 1: Mount the mattebox on the topmost bracket on the swing away arm. This should lift the mattebox 1 3/4" above the rails. Align the mattebox so it is perfectly horizontal and tighten the knob. Next we got to give the mattebox some structural support.
 Step 2: You need one short 15mm rail. I use a 4 1/2" rail in the picture above. Next, you need 2 Redrock MultiMount (Is there anything those little suckers cant do?) into the rod.
  Step 3: Loosen the thumbscrew on the multimounts and then slide in into the swing away rods and then tighten all knobs. This is so, to give back structural strength and integrity to the mattebox.
 With my 'mod', you still have about 3/4" of room before the longest part of the 360 degree rotatable filter tray touches your rails.
 The entire assembly from the right side. The entire thing is as rock solid as the original. It does not have any flex whatsoever at all. No more custom rails or rail swapping to compensate for different lenses.Hey Redrock, what about having black as a color option on the multi mount ??
Now you can use your Redrock Shoulder Mount with your Redrock Mattebox on the same setup. Now thats a sea of baby blue on the rig.

Hope This has been helpful to you guys out there. Cheers.


3 comments:
It's an interesting approach. How does this match up vertically to the camera? I would expect it's too high.
Well, I use a Zacuto Baseplate and the Zacuto Z Riser that both have vertical adjustment to compensate with the increased height. You also have the vertical adjustment built in to the swing away rod component itself.
The easiest way is to see if your baseplate manufacturer has option to rise their platform. With many of today 35mm dof adapter flip design, most rail system manufacturer offers "lift" option to their baseplate to get the camera to the appropriate height.
I use the mattebox with 5.65" square filters and it's not a design flaw. all matteboxes that support that size filter hang in front of the rods. You don't need to swap out different lengths of rods, you just need to slide them back. If you got a zacuto rail system, that is the problem: their rods don't slide. Your baseplate and riser probably cost more than the mattebox. get a redrock one instead and return the zacuto. you will end up making money
Post a Comment